Monday 11 December 2006

Picasa 2

Picasa is even easier to use for organizing, editing, and sharing your digital photos. Without leaving the application, you can now move photos across your Microsoft Windows file tree, add captions to your pictures, pan and zoom, and use 12 new lighting and color effects. You can also save photos to an external drive, burn them to a disc, or upload them to popular photo-sharing Web sites. And that's just for starters.
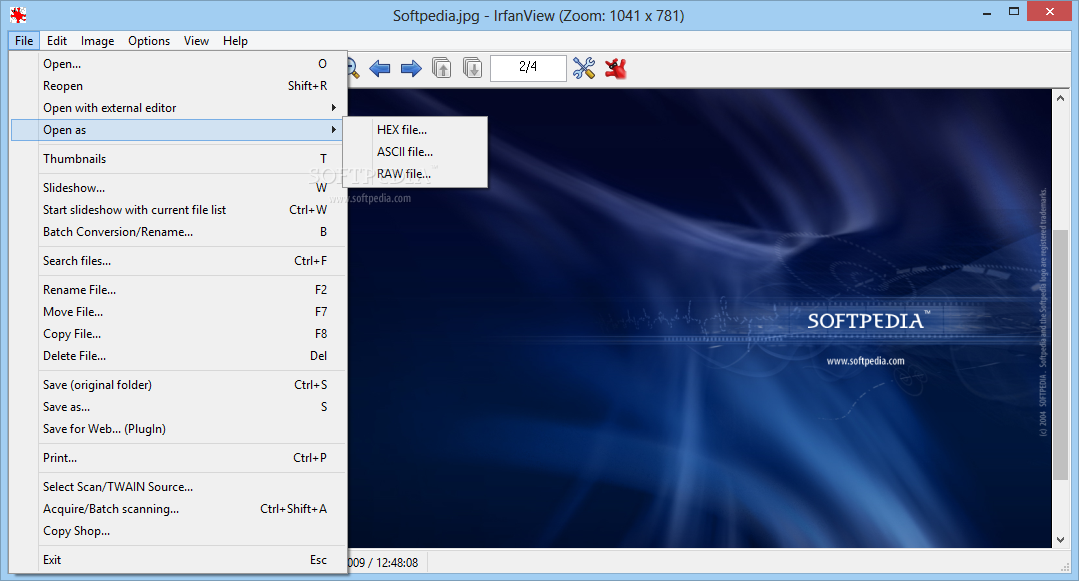
The final installed size of this software is just about 15.3 MB. Not too heavy on the resources, but as the number of photos in your collection increases, response times can worsen. When you install the app, it immediately scans your system for photos and collects them into a single library. By default, Picasa scans your entire hard drive, but if your system is particularly cluttered, you might opt for a scan of just your Windows desktop, your My Documents folder, and your My Pictures folder. The app collects not only JPEGs and GIFs, but all sorts of other image formats—even video files.

UI and Usage

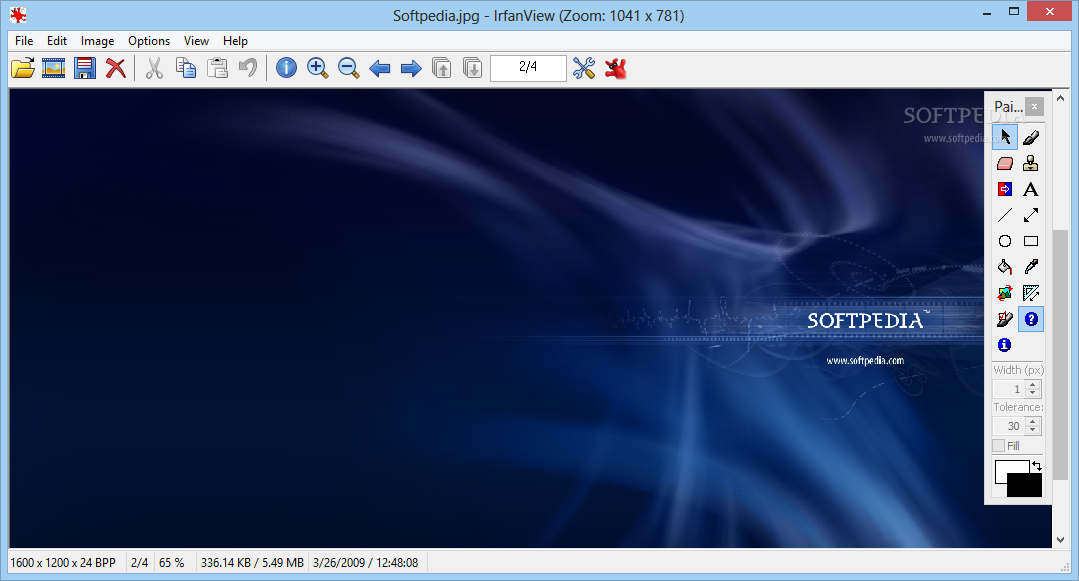
Picasa has the most user-friendly and intuitive interface you could hope for. Light blue and a silvery-grey tone dominate the pages and this makes it very soothing. What this also does is present the user with the best possible background for viewing photos. The aforementioned silvery-grey background is, in fact, 18 per cent grey, which brings out the best of all colours from your photos.

Navigation is easy thanks to the no-clutter layout, including a listing of ‘Folders on Disk’ on the left and a preview thumbnail — the size of which is configurable—on the right. A row of buttons on the top gives one-click access to importing photos from a digital camera, scanner or even removable media like a pen drive.

Other prominent buttons on the top include Slideshow, Timeline, Gift CD and Backup, the last being the most innovative and well thought out of all the features.

Sorting of photos happens as and when they are found, and by default, the photos are sorted by the date when they were taken. This information is normally pulled out from the EXIF data embedded into the image or the creation date in the case of artworks. Re-sorting these is possible, but our experience tells us that this is the best way to leave them.

Once your photos are sorted and available for viewing or editing, you’ll notice two distinct drop-down menus in the left panel. One is ‘Images on Disk’ and the other one is ‘Other Stuff’. As the names suggest, the first one lists all folders on disk depending on the date of creation (note here that in this case, the date of creation of the folder is taken into account and then the oldest photo in that folder when sorting). ‘Other stuff’ normally contains photos that are either system images or images that the program cannot decipher and sort.

To make navigation even easier, you could assign labels to photographs. This can be done either individually or in batches. When you click on a photo in the preview mode, click ‘Hold’ in the lower panel and this will ‘Hold’ your photo in the tray. To remove them from the tray, just click ‘Clear’. Clicking ‘Clear’ does not delete your photos; it just removes them from the tray. Why is the tray there at all? So you can perform actions on batches of photos. Speaking of which, let’s complete the labelling of photos. Once you have held any number of photos in the tray, click a small button under the ‘Clear’ button that says ‘Label’, and create an appropriate label like “Office Party” or “Bungee Jumping” (or whatever!) and click. You’re done. A new drop-down menu is formed in the left panel, and clicking on a label will show only those photos associated with that label. More photos can be added to this by just right-clicking on a photo and assigning that label to it. Seriously, it doesn’t get any easier.

Once you have your photos in Picasa, it’s no longer necessary for you to remember where they are stored on the hard drive. Hitting [Ctrl] + [Enter] opens up the folder where they are stored. Just in case you would like to attach them somewhere and couldn’t remember!

Printing is also possible. This is another aspect where the tray comes in handy. If you were in the US, you could have also ordered a backup CD of select or all photos. Otherwise, you can still burn your own CDs for backup using Picasa itself.

Blogging is also possible. The program comes with two inbuilt buttons: Blogger and Hello. You’ll need to install the Hello tool first, though, to upload to your Blogger blog. This can be a little cumbersome—it takes up a fair amount of time, and the Hello tool is a touch slow.

Additional Features

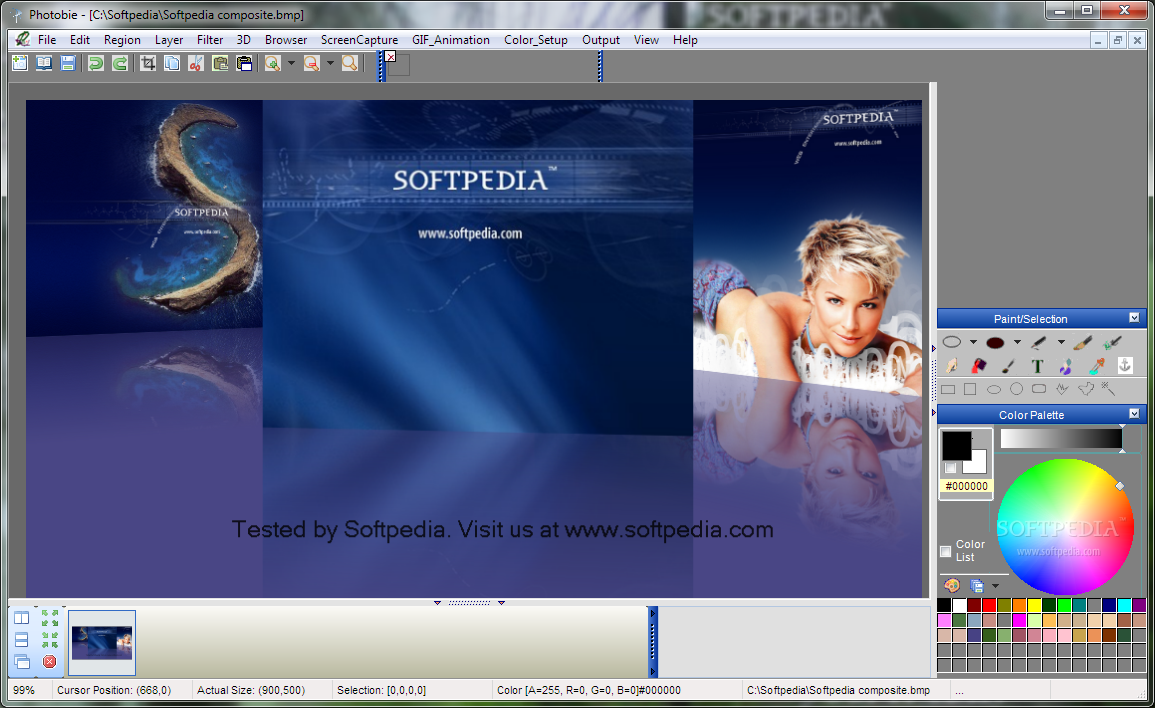
Given that this is image management software, there are some rather handy tweaks available which work better than most other quick fixes you could hope for. To access these, you need to double click on any photo, which will take you to the fixing screen.

The image editing options in Picasa are divided into three parts: ‘Basic Fixes’, ‘Tuning’ and ‘Effects’. Here’s a look at all three. ‘Basic Fixes’ include Crop, Straighten, Red Eye, I’m Feeling Lucky (typical Google!), Auto Contrast, Auto Color and Fill Light. The fixes are all only the basic ones, but in a nutshell, these are the most essential ones you could want.

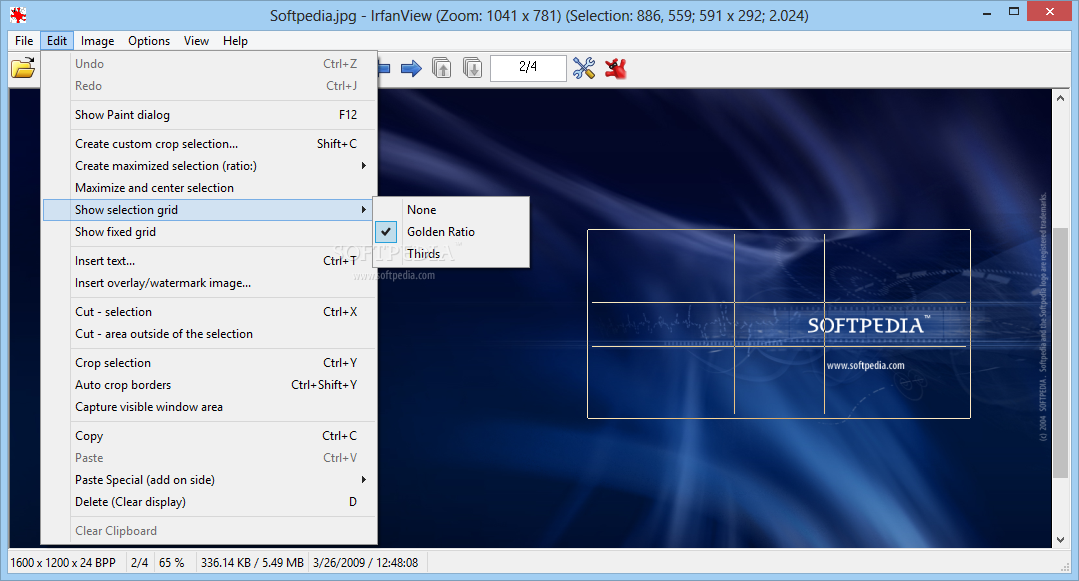
‘Crop’ does just that and helps you compose an image better. ‘Straighten’ creates a grid over the photo, which lets you straighten any skewed photos and settle them on an axis.

The good thing about this is that it lets you just adjust a scrollbar for straightening the photo in either direction. ‘Auto Contrast’ and ‘Auto Color’ work pretty well too, but not with reasonably well-exposed photos. Photos with visibly poor exposure are the ones that get altered the most using either of these tools. The ‘I’m Feeling Lucky’ button just adjusts the photo taking what it thinks would be the best settings. In short, this is the onetouch fix.

The most impressive tool in this entire list, though, is the Red-Eye reduction. Since the dawn of time (or photography), red-eyes have been staring back at unsuspecting viewers making most people resemble hounds caught in the headlights. But no more!

Among all the tools we have seen, we are about to stick our neck out and say this is the easiest and among the more reliable ones to use. Once activated, you’ll see a ‘draw’ kind of tool that lets you pull a square around the red-eye. That’s it. That’s all you have to do. The rest is done by the program. Now, we had quite a range of red-eyed photos, and we’re thrilled to report that our success rate was about 98 per cent. Impressive.

Moving along, the Tuning option allows some more control over image attributes and lets you adjust ‘Fill Light’, ‘Highlights’, ‘Shadows’ and ‘Colour Temperature’, and also lets you pick a neutral colour. The most impressive of all these is the ‘Fill Light’ function, which will fill in light in any underexposed areas. Manual control is available here, and you can choose how much light you want ‘filled in’ into your photos.

‘Effects’ is more for playing around with your images, and we strongly suggest creating a backup before venturing into this. Normally, you are allowed to go back only one step at a time (unlike in Photoshop where you can cancel a range of commands), and it’s good practice to just wait and watch while your command takes effect—rather than go trigger happy and click all the available effect buttons!

In all, there are 12 effects available, but the more useful of the lot were the ‘Sharpen’ and ‘Warmify/Saturation’ effects. Other effects included Sepia, B/W, Film Grain, Tint, Soft Focus, Glow and so on.

Some additional features include the creation of slideshows and screensavers from your collection itself. The screensaver option is especially fun since you can bunch together a group of photos and have it pop up every time your computer is inactive. For a one-stop solution to your photo organisation worries, this is by far the best tool available. What makes it really, really good is the fact that it’s free!

FastStone 4in1 Browser 1.3

FastStone 4in1 Browser is a FREE multi-window Web Browser with a built-in Web Server, a fully functional FTP Client and a drag & drop Image Viewer.
It enables users to surf the web, run a web server, transfer files between his computer (client) and servers, clean IE records, view and capture images from web pages within one single application. It is a fast, stable, skinable and 100% Free!

The FastStone browser looks like a cross between Internet Explorer and Mozilla Firefox, but behaves more like IE. It also has inbuilt support for IE and can import from and export to IE seamlessly. This is especially useful if you are creating a Web site, since you can send images from here directly to IE for preview in a browser or even configure FastStone to display them so.

FastStone has a powerful inbuilt image viewer that enables users to capture any portion of the screen—a rectangle or an irregular area—to the image viewer, the clipboard or a file. It also allows users to drag and drop images from Web pages and view them within a magnified format and to resize, crop, rotate and save images in different formats.

One of the other major features of this browser is its ability to capture screenshots. It’s a three-click process. Clicking on the ‘computer’ icon next to the address bar will pop up a menu that gives you the choice of the destination to which you want to save the screenshot (image viewer, clipboard or file). Once you’ve chosen the screen, it will be sent to the destination you chose.

Download it from here

Sunday 10 December 2006

XnView 1.90 Beta 3

With XnView you can quickly and easily view, process and convert image files. The program can read more than 400 different formats and then convert them to other formats such as GIF, BMP, JPG, PNG and even multi-page TIFF. XnView can also display video formats, many digital camera formats and even some relatively unknown formats such as Amiga IFF and Calamus.
XnView operates in three different Modes: ‘Basic’, ‘Browser’ and ‘View’. The mode in which the browser opens depends on whether there is no window, if there is a Browser window or a window with an opened, active image. The mode decides which functions are available in the menus and displays the relevant symbol.

Modes The Main Window is displayed when XnView starts up. This is the Basic/Default Mode, and XnView is in this mode until the Browser is opened and as long as no images are opened and active.

In the Browser Mode, you can display the file directory hierarchy, list of files and preview of images in the current directory. In the Image View Mode, the main window opens with an open image in the bottom part of the browser. An image can be opened using the Browser (by searching for files) or Direct Opening (through Windows Explorer).

Additional information about the open image is displayed in the status bar at the bottom of the main window. The number of frames is also displayed in the status bar.

The Image viewer is similar to Windows Explorer. You simply navigate the directory structure as desired, and any image files found in a directory are displayed in thumbnail format. This lets you keep an overview of the images available, and at the same time lets you quickly view and select specific images. XnView can be run without installation and this makes it perfect to be used as a “photograph album on CD”, especially because it is free for personal use. XnView is also good for the presentations on a CD because it runs without the need for the software to be installed on the computer despite saving in a proprietary manner.

Apart from offering easy image viewing, XnView also offers more advanced features such as Web page creation, contact prints (images the size of negatives), multiple conversion (format and transformation), slide shows, screen capturing and TWAIN support for scanners and digital cameras.

Numerous image filters and effects for image processing are available. Connecting with other popular professional graphic programs, say, Adobe Photoshop, can be done using the ‘Drag and Drop’, ‘Clipboard’ or ‘Open With’ menu options. It’s got it all! XnView lets you create the optimal defaults according to your needs and preferences—for example, you can define templates according to which a Web page will be created directly from the application. Operations such as copying, moving, and creation of directories and files makes XnView the universal tool for viewing and browsing through graphics.

Here’s a list of the most important functions in XnView:

- Import about 400 graphic file formats
- Export about 50 graphic file formats
- Multipage TIFF, Animated GIF, Animated ICO support
- IPTC, EXIF
- Resize
- Adjust brigthness, contrast...
- Modify number of colors
- Apply filters (blur, average, emboss, ...)
- Apply effects (lens, wave, ...)
- Fullscreen mode
- Slide show
- Picture browser
- Batch convert
- Thumbnail create
- Screen capture
- Multi-page file create (TIFF, DCX, LDF)
- TWAIN support (Windows only)
- Print support (Windows only)
- Drag & Drop support (Windows only)
- 44 languages support (Windows only)
- The XnView Browser is similar to Windows Explorer. It lets you navigate the directory structure, displaying all pictures in the current directory in thumbnail view.
- Standard file operations such as copying, moving and deletion of files can be performed.
- XnView can display pictures in configurable slideshows. You can also display pictures directly from CDs (self-starting slideshows from CD), resulting in an electronic photograph album.
- Open and exchange pictures with other applications using Drag & Drop.
- Create contact sheets with thumbnails of pictures.
- Retrieve and display important image information such as size and colour density in a number of different ways.
- Supports scanners and digital cameras directly using the TWAIN protocol
- Create Web pages with images including navigation and preview.
- Play the most popular sound files including .mid, .rmi, .wav, and .mp3.
- Rotate or flip JPEGs with no loss of image quality.
- Join images horizontally or vertically to create panorama images.
- XnView is extremely flexible and allows a high degree of optimisation and default settings. This means it is easily tailored to individual needs and preferences.

Pros: It's efficient, easy to use and not a hassle to install. It is fast, reads many file formats and above all is not cluttered. Also free for private users and an all around speedy program.

Cons: XnView is NOT FREE for commercial use so buyers beware.

Download it here

IrfanView 3.99

IrfanView is a fast and compact image viewer/converter. It is trying to be simple for beginners and powerful for professionals. Many supported file formats and features. Features include: multi-language support, Thumbnail option, slideshow, fast directory browsing, batch conversion/editing, multipage editing, file search, change color depth, scanning, cut/crop, IPTC edit, capturing, lossless JPG operations, effects (sharpen, blur, Adobe Photoshop filters), EXE/SCR creating, many hotkeys, command line options and plugins.
Version 3.99 introduces a host of updates, including support for PDF export; new Thumbnails option: Load file list from TXT; support for new formats (SIF, PVR, AWD); zooming and scrolling is now possible in slideshow mode.

Note: IrfanView is now bundled with Google Toolbar and Google Desktop Search. Installation of these components is optional.

Here are some key features of "IrfanView":

- Many supported file formats
- Multi language support
- Thumbnail/preview option
- Slideshow (save slideshow as EXE/SCR or burn it to CD)
- Show EXIF/IPTC/Comment text in Slideshow/Fullscreen etc.
- Support for Adobe Photoshop Filters
- Fast directory view (moving through directory)
- Batch conversion (with image processing)
- Multipage TIF editing
- Email option
- Multimedia player
- Print option
- Change color depth
- Scan (batch scan) support
- Cut/crop
- IPTC editing
- Effects (Sharpen, Blur, Adobe 8BF, Filter Factory, Filters Unlimited, etc.)
- Capturing
- Extract icons from EXE/DLL/ICLs
- Lossless JPG rotation
- Many hotkeys
- Many command line options
- Many PlugIns
- Only one EXE-File, no DLLs, no Shareware messages like "I Agree" or "Evaluation expired"
- No registry changes without user action/permission!
- and many more

Developed by Irfan Skiljan—a student at the University of Vienna— in 1996, IrfanView has enjoyed some phenomenal success since then. One of the primary reasons is its ability to display virtually any type of file (including movie files) and do so in a light interface.

Moving along to the main Viewer: one of the major advantages of IrfanView is that you can lock a particular zoom position, and all photos that point forth (for that session) would be displayed at the same percentage. This has some advantages in the sense that you can flip through photos faster, and rendering photos doesn’t take as long, since the viewer knows exactly what zoom level to bring every photo to.

IrfanView is not just about viewing photos. It lets you do some minor editing as well. The options available are so widespread that it’s not possible to list them all here! But some of the more impressive ones are:

Slideshow, batch conversion, Acquiring from a TWAIN source, Batch acquire or scan, add text to photos, convert to greyscale, enhance colours, reduce red-eye, change colour palettes, and even capture screenshots. To be honest, this is just about 10 per cent of what it can do.

But the biggest advantage is the fact that IrfanView is the fastest viewer and can display almost all file types!

Download it here

Photobie 2.9.2

Photobie is an image editing software. It is customized for photo editing. It supports multi-layer editing. Photobie's screen-capture feature make your life easier for preparing presentation. Unlike other free software, it allows you to do photo frame editing and you can view directories with just the images showing up.

Photobie is also a .NET windows application, and the .NET Framework 1.0 or higher needs to be installed before you can run it. Among the free programs, this is one of the best available—a commendable fact, considering it's been (and is being) developed by Xuedong Chen, a PhD candidate in Boston. According to the Photobie site, "the developer intends to deliver Photobie as a freeware and is willing to keep updating it with new useful features". Noble indeed.
Some of the main features of Photobie include a hotkey setup that allows users to customise up to eight keys for instant actions. Photobie also lets users capture any shape, and is not bound by the usual rectangles, circles or squares! You can also capture any screen to the image editor for instant editing in addition to capturing it to the clipboard.

Keeping up with the growth of images on the Web, Photobie also has a specification that makes image output easier—users can predefine output image size for such usage making work faster. The exported images can be captured to a temporary bitmap image file and edited in another program if required. Perhaps the most advanced of all free image editing software, Photobie lets users do some nifty multi-layer image editing. That means users can clone, copy, paste, delete, merge, move backward/ forward, and set up layer transparent colour with RGB tolerance! Still think you need Photoshop?

It's not only advanced features, though. The software also has features for basic editing tasks, such as draw/fill any shapes, and it also writes text. The draw/fill is treated as a new layer so you can easily move and adjust it. General image editing includes selecting shaped areas, copy, cut, paste, paste as new image, erase, zoom, resize, rotate, flip, adjust colour brightness/contrast/alpha/gamma/saturation, etc.

Unlike Photoshop, most other image editing software allows for only one or two-step undo options. With Photobie, though, there is undo support for erase (unlimited step undo), resize, rotate, and colour adjustment.

File formats supported:

BMP, TIF, PNG: 32-bit true colour image support
JPEG: Supports different quality compression
GIF: Supports both low-quality 256 colour compression and high-quality 256 colour compression (with transparency)
ICO: Supports transparent icon files, supports true-colour 32- bit with multiple bitmaps in one icon file with dimensions as (64 x 64, 32 x 32, 16 x 16)
PHOTOBIE (.pob): Multi-layer file format for multi-layer image editing support.

All these features are well integrated. You could also use Word to create all sorts of 'Art' fonts and text and capture it to Photobie, then set the transparent colour to White for the new layer. Here's a sample of how simple a task in Photobie can be:

To resize an Image/Layer:

Click on the 'Image > Resize' menu item. You'll see a dialogue form asking for the image size in pixels. If you want the width and height bounded as the original image, you need to check the 'Bounds' checkbox. After you click OK, the image is resized. Done. Alternatively, you can use the 'Zoom In' or 'Zoom Out' buttons on the toolbar to resize the image without losing resolution. To adjust the colour of an image/Layer:

Click on the 'Image > Adjust colour' menu item. A colour adjust menu will pop up with the balance control panel. With the trace bar, you can adjust the contrast, gamma, alpha (transparency) and even the three RGB components specifically. As you adjust, the preview panel shows the exact effect on the original image.

Complicated as it may sound, multi-layer editing is not tough with Photobie. Here's what is required

Select a layer: The simplest way is to double-click on the layer on the image directly. In case others hide the layer, you need to select it from the list box of the 'Layer Manager'.

Move the layer: Select the current layer and click on the 'Hand' button in the toolbar on the left. You can then drag the layer to the destination position.

Erase the layer: Select the current layer and click on the 'Eraser' button in the toolbar on the left. You can then erase the layer by dragging the mouse or left-clicking. You can also apply unlimited Undo for erasing.

Add a layer: the new layer is generally added through paste, draw/fill shapes, write text. In fact, every draw/fill action starting from mouse down until mouse release is considered a new layer. This feature allows you flexible control over the last action.

The default viewer bundled with Windows XP can display JPEG, GIF and other common formats, but when it comes to some of the heavier (read better) formats such as TIFF or PSD, the viewer can't recognise the format. Fortunately, today there are free options available to solve this problem.

Download it from here

PaintBox 2.2.8

PaintBox is a simple paint program with a variety of features that are not included in many of the major paint programs. Features include recent files image previews, recent colour list, and multiple clipboard entries. This program is ideal for people who do not want a big and powerful photo editor but do want a hassle-free way to create their own images.
This is a light tool that is also very light on resources, and has some fairly advanced functions to go with an easy interface. Basic functions include flipping photos, creating mirror images, resizing, resampling, and even increasing the canvas space of the image.

The more advanced functions in PaintBox allow brightness, gamma, colour, contrast, RGB greyscale and negative adjustments. We put the software to the test to see whether it was competent to carry out all the above tasks.

RGB adjustment on a photograph was good, and allowed changing of individual colours in addition to the overall colour range (RGB or CMYK). However, options like creating layers for adding effects or text are not available, and while this is a drawback, it is not restrictive for basic editing and enhancements.

Also, when it comes to resizing or resampling of images, there's not too much trouble since it is just a three-step activity.

Pros: if your not big into photo editing and currently use mspaint to do the simple tasks you need then this is the perfect replacement as it has alot more features. No installation required.

Cons: its not no photoshop but if you want simplicity, this is it.

Download it here

Wednesday 6 December 2006

mpTrim

mpTrim is a simple and easy to use MP3 editor. Use it to improve your MP3 collection.
mpTrim is a tool that lets you automatically detect silence at the beginning and at the end of MP3 tracks and remove it, thus reducing file size. It also allows you to adjust the sound volume, which is a great help, since most MP3 files are too low in volume comparing to original CD tracks. What's more, the program lets you deal with corrupted MP3 files, throwing away all the rubbish it might have got while being downloaded and leaving the file clean and ready to be played by any conventional MP3 player.

It can fade-in/out MP3s (to fix abrupt beginning/ending). It can clean-up MP3s and recover wasted disk space. It keeps the music quality intact, no matter how many times you process an MP3, because it works directly in the MP3 format without having to decode/re-encode. That also makes it very fast.

mpTrim is freeware. You can Download it from http://www.mptrim.com/mpTrim.zip.

Audacity

Audacity is one of the best freeware software available for audio production, and compares with some of the best, paid software around. Here is how you go about installing and using this software. You can download Audacity from http://audacity.sourceforge.net/download/. It’s also provided on the DVD.

Installing audacity is no big deal, and all you need to click on are the Next buttons (as usual) until the installation starts and finishes.
Audacity installs by default in C:\Program Files\Audacity\, unless you really need to change the path. This is the main folder. Inside this folder you will find another folder which is of much importance to us. This is the Plug-Ins folder. This is where you will keep all your plug-ins and use them as and when required by you. There are plenty of plug-ins available for Audacity and all you need to do is search the Net for some.

Here is the screen that you see when you run Audacity for the first time. For importing a file into Audacity, click on File > Open and then look for any audio file to import. Audacity can import WAV, MP3 and Ogg files.

If you are recording something then you need to use the microphone to record audio into Audacity. If you notice, the default selection in Audacity is the microphone. For recording, here’s what you need to do.

Place your microphone close to your instrument. Make sure it isn’t in your way while you’re playing. To record, press the round red button, which is similar in almost all recording programs for computers.

You will not see the waveform while recording, but you will be able to monitor the amplitude. If it is getting close to the top and bottom of the panel, (1.0 and -1.0) lower the microphone volume using the slider with a microphone picture by it. If it is very thin, without getting near the “0.5 and -0.5” at the loudest points, you may need to raise the volume a little. When done, click on the square stop button. On playback the waveform will appear.

Once the recording is finished, click the Play button and it will play the music you just recorded. The next thing is to remove the blank space at the beginning and end of the recording. For now, trim to the approximate size (take care to not trim too much since you can set the start and end points more precisely with the ‘Cut’ tool later). Just place the mouse cursor right before the spot from where the music starts. Now holding the left mouse button down drag to the right, the waveform background will darken where you are dragging because you are selecting this area. When you get to the end of the music release the mouse button and go to Edit and click on it. Selecting ‘trim’ will remove the sections before and after the selected area.

Listen to the edited track so you know that you didn’t cut it too short and if you did, don’t worry, you can always undo what you did by clicking on ‘Undo’ under ‘Edit’ in the menu. Now to save the music file, go to File > Save project as, or if you want to save it as a WAV file, ‘Export as WAV’. It will then let you chose where to save it and name it.

Once you have saved it, you can now load it back into the program and fool around with it all you want without messing with the copy you saved. If you have pauses within the music that you want removed, listen carefully and watch as you play your file back, making note of just where you think you need to cut. Then, place the mouse cursor at the left side of the spot that you need to cut out and holding the left mouse button down drag to the right. The waveform background will darken where you are dragging because you are selecting this area. Let up on the mouse button when you think you have marked the right area. If you think you marked it wrong, just move the cursor anywhere outside the panel the waveform is in, and left click-this will erase what you marked so you can start over.

You can also add various effects and more to the recording that you made. You can also use VST and Nyquist plug-ins. All this for free! The only thing that you need to have is a good system that can provide the software the juice that it needs to run properly.

Have fun, and send us some of the audio you create!

mpTrim

mpTrim is a simple and easy to use MP3 editor. Use it to improve your MP3 collection.

mpTrim is a tool that lets you automatically detect silence at the beginning and at the end of MP3 tracks and remove it, thus reducing file size. It also allows you to adjust the sound volume, which is a great help, since most MP3 files are too low in volume comparing to original CD tracks. What's more, the program lets you deal with corrupted MP3 files, throwing away all the rubbish it might have got while being downloaded and leaving the file clean and ready to be played by any conventional MP3 player.

It can fade-in/out MP3s (to fix abrupt beginning/ending). It can clean-up MP3s and recover wasted disk space. It keeps the music quality intact, no matter how many times you process an MP3, because it works directly in the MP3 format without having to decode/re-encode. That also makes it very fast.

mpTrim is freeware. You can Download it from http://www.mptrim.com/mpTrim.zip.

http://www.mptrim.com/images/lan/mpTrim_English.gif

Audacity

http://audacity.sourceforge.net/about/images/audacity-linux-small.jpg
http://audacity.sourceforge.net/about/images/audacity-windows.png

Audacity is one of the best freeware software available for audio production, and compares with some of the best, paid software around. Here is how you go about installing and using this software. You can download Audacity from http://audacity.sourceforge.net/download/.

Installing audacity is no big deal, and all you need to click on are the Next buttons (as usual) until the installation starts and finishes.

Audacity installs by default in C:\Program Files\Audacity\, unless you really need to change the path. This is the main folder. Inside this folder you will find another folder which is of much importance to us. This is the Plug-Ins folder. This is where you will keep all your plug-ins and use them as and when required by you. There are plenty of plug-ins available for Audacity and all you need to do is search the Net for some.

Here is the screen that you see when you run Audacity for the first time. For importing a file into Audacity, click on File > Open and then look for any audio file to import. Audacity can import WAV, MP3 and Ogg files.

If you are recording something then you need to use the microphone to record audio into Audacity. If you notice, the default selection in Audacity is the microphone. For recording, here's what you need to do.

Place your microphone close to your instrument. Make sure it isn't in your way while you're playing. To record, press the round red button, which is similar in almost all recording programs for computers.

You will not see the waveform while recording, but you will be able to monitor the amplitude. If it is getting close to the top and bottom of the panel, ( 1.0 and -1.0) lower the microphone volume using the slider with a microphone picture by it. If it is very thin, without getting near the "0.5 and -0.5" at the loudest points, you may need to raise the volume a little. When done, click on the square stop button. On playback the waveform will appear.

Once the recording is finished, click the Play button and it will play the music you just recorded. The next thing is to remove the blank space at the beginning and end of the recording. For now, trim to the approximate size (take care to not trim too much since you can set the start and end points more precisely with the 'Cut' tool later). Just place the mouse cursor right before the spot from where the music starts. Now holding the left mouse button down drag to the right, the waveform background will darken where you are dragging because you are selecting this area. When you get to the end of the music release the mouse button and go to Edit and click on it. Selecting 'trim' will remove the sections before and after the selected area.

Listen to the edited track so you know that you didn't cut it too short and if you did, don't worry, you can always undo what you did by clicking on 'Undo' under 'Edit' in the menu. Now to save the music file, go to File > Save project as, or if you want to save it as a WAV file, 'Export as WAV'. It will then let you chose where to save it and name it.

Once you have saved it, you can now load it back into the program and fool around with it all you want without messing with the copy you saved. If you have pauses within the music that you want removed, listen carefully and watch as you play your file back, making note of just where you think you need to cut. Then, place the mouse cursor at the left side of the spot that you need to cut out and holding the left mouse button down drag to the right. The waveform background will darken where you are dragging because you are selecting this area. Let up on the mouse button when you think you have marked the right area. If you think you marked it wrong, just move the cursor anywhere outside the panel the waveform is in, and left click-this will erase what you marked so you can start over.

You can also add various effects and more to the recording that you made. You can also use VST and Nyquist plug-ins. All this for free! The only thing that you need to have is a good system that can provide the software the juice that it needs to run properly.

Have fun, and send us some of the audio you create!

CDex

CDex is an excellent software for converting CDs To MP3s. It is an application that records audio tracks from CDs and saves them to a disk as regular WAV files or as encoded sound files. This program features an MP3 decoder (MPEG 1/2/3-based) and a new LAME encoder, and has built-in support to generate OGG Vorbis files. CDex is available in English, German, Italian, and Spanish. This latest release includes better support of USB drives when using Native NT SCSI library option and various bug fixes.

The current version is 1.5.1. You can download the latest version of CDex from http://www.cdex.n3.net
Using CDex is simplicity itself. Put a CD in your computer, load CDex, and click on the button to Extract The Tracks As Compressed Audio files. Wait a couple of minutes for it to do its stuff. Your CD will have been converted to mp3 files (or ogg, wma, monkey audio, or some even more obscure file types that I've not heard of). You can then listen to these files, and the rest of your CD collection that you've converted, without having to dig out the CD you want. Mp3s are soooooo much easier than CDs! If you don't have enough hard drive space for your CD collection, buy a bigger hard drive!

The tool also features a built-in sound player, so you can preplay songs before and after you rip or convert them. Download this tool today and check it out yourself.

Tuesday 5 December 2006

dBpowerAMP

dBpowerAMP is one of the fastest rippers available. Unlike EAC, this software is meant for those users who just want to rip and listen, quality be damned! If you are one of them, then dBpowerAMP is the tool that you need. The download size of this software is a mere 1.9MB, and the installer has the LAME encoder bundled with it. So, you do not need to go online and hunt for LAME to download and install it.

Once you have downloaded the software, installation is a quick and no-fuss process with minimal pain for you to go through. The software integrates into the Windows shell and any music file that you right-click on now has an option of “Convert to", which when you click opens the main interface of dBpowerAMP.
Here’s how the user interface looks. It may just seem a bit cluttered, but don’t worry, we’ll soon clear it up for you. By default, dBpowerAMP can only encode ripped WAV files to MP3. However, if you want to encode in any other format, you will need to download and install the particular encoder that you want to convert the WAV file into such as FLAC or Ogg Vorbis. dBpowerAMP also has support for Windows Media 9, but no WM10 support. If you choose MP3 as your encoder, then you can see a slider that shows you the bitrate at which the desired song will be encoded in. If you want to change the encoding bitrate, then all you need to do is drag the slider and the bitrate is automatically set to what you want, the highest being 320 Kbps and the lowest being 32 Kbps. Choose the bitrate according to your preference. Most MP3s are encoded using 128 Kbps, so a setting of 192 Kbps ought to suffice for casual listeners. Use 320 Kbps if you want quality and don’t care about disk space.

If you are the kind of user, who always wants to get inside the hood, then dBpowerAMP also offers you the advanced options, which lets you tweak the encoder settings according to your preference. For this, click on the Advanced Options button.

After you have set all the options, click on the OK button to apply the changes and then click on ‘Convert’ in the main window to start the ripping and encoding process. You can download the latest version from http://www.dbpoweramp.com/.

Monday 4 December 2006

Exact Audio Copy (EAC)

Before you start playing your music, you need to have it on your hard drive. Of course, you can download it from the Internet (legally), or you can rip your existing collection of CD’s and convert them to the format that you want. We will talk about two rippers that are not only freeware but also the best in the business.

Exact Audio Copy (EAC)

This is the best CD ripping and converting software on the planet, period. Exact Audio Copy is the brainchild of AndrĂ© Wiethoff, who is currently studying at the University of Dortmund and says that the reason he created EAC was that he got fed up with all the other CD rippers available around. We couldn’t agree more! The best part of EAC is that it is cardware (freeware, in disguise actually!). All you need to do to register your copy of EAC is to send a card, a postage stamp addressed to AndrĂ© Wiethoff, and that’s it, you’re done!
EAC is in its beta stage at version 0.95 and is approximately a 1.5 MB download. Not too much of a bandwidthhogger, this program! Installing EAC is pretty simple and easy to understand instructions are available during the installation process to help you.

EAC by itself is only able to rip music to WAV files. If you want to compress these WAV files using external decoders such as the LAME MP3 encoder or Ogg Vorbis, then you will need to download and install these software from the internet and configure it with LAME.

EAC comes with options to obtain CD information from freedb.org. Again you will need to configure the options in EAC. We will help you out with a small workshop on EAC, which will let you configure EAC and help you create quality rips from your CD.

EAC Workshop

1. Download EAC from http://www.exactaudiocopy.org/eac6.html and then install it.

2. Download LAME from http://lame.sourceforge.net. This will be a zip package (latest is 3.96.1 stable) and you will have to unzip it.

3. After installing EAC, run the program.

4. Next, you will see the option to choose the CD/DVD-ROM drives that you will be using for ripping the CD’s.

5. On the next screen, you will be asked to choose between EAC providing you with accurate results or if speed is only concern. Error correction is one major factor here, since if speed is your only criteria, error correction when ripping CD’s will be poor. Choose “I prefer accurate results” only. This will help in getting good quality rips. Make sure that you have a audio CD inside the drive before you click on the next button.

6. The next screen will tell you about your drives capabilities.

7. Finally, EAC has your drive configured and ready, but wait there’s more to go. We still need to configure the encoder in EAC. Click on Next to continue. In this workshop, we are using LAME, which is a free MP3 encoder. You can configure any other encoder such as PsyTel AAC encoder or Ogg or FLAC or APE, whatever you prefer. The steps though, remain the same.

8. Click on Next to continue. This will make EAC search for the LAME.exe file which is the encoder executable needed for compressing the ripped WAV file to MP3.

9. Once EAC locates the LAME encoder executable. Let the default options remain unchanged.

10. The above instructions are the most important in the setting up EAC, once done, here is how you go about ripping a song. There are further options that you can use but are beyond the domain of this blog. You will need to research and try these options. Remember, some of the options such as enabling Paranoid mode for reading CD’s can damage your optical drive and in some cases the CD too. For this, insert a CD in the drive and start EAC. If you have the Freedb database options enabled, you will be able to see the CD information.

Say, if you want to rip just one song, click on the song that you want to rip and click on the MP3 button on the side bar. If you want to rip the whole CD, do not select any song, just click on the MP3 button. EAC will only prompt you to specify the location to save the songs to. Once that is done, you are good to go. This is what happens next.

EAC has rocketed to popularity since the time it became available to the public. Nevertheless, what we have mentioned here is just the tip of the iceberg. There is a lot of customization that is possible with EAC, but if you are looking for a no-fuss, straight up Audio CD rip, then this software will definitely interest you.

Musicmatch Jukebox

Musicmatch Jukebox has long been a major player in the digital audio player category, however it always came in third. Mostly because of its resource hogging nature and also because it has remained a shareware player from the beginning. Another factor is the limited enhancements that are available for the player. But these does not in any way make this player a lesser mortal. Musicmatch Jukebox was one of the first players that let users on to the completely new world of online radio. Another first was the “try before you buy” shopping style of online music, which later became a rage with iTunes (their marketing strategy and pricing was much better). Something better than what iTunes offers is the sampling of what you are getting before you buy a song. You can savour different genres of music for a little fee every month, which was possible only with this player earlier but is now available on most players.

Musicmatch Jukebox 10

Musicmatch Jukebox was bought over by Yahoo! Inc in 2004 and is in version 10 currently. The free version of MusicMatch Jukebox does not offer you much in terms of features however the Plus or the paid version allows to rip CD’s and also convert music from old tapes to MP3’s.

Musicmatch Jukebox has its fair share of fan following, however with new players coming up every other day and older players getting a makeover of late; Musicmatch Jukebox does need to renew its looks.

The good: Radical interface upgrade offers speedier performance and customization; On Demand subscription service nicely integrated into jukebox; remote access to On Demand; share playlists with non-Musicmatch friends; all-in-one player, ripper, encoder, burner, online radio receiver, music manager, MP3 player loader, and download service; secure songs transfer to MP3 players; supports Universal Plug and Play devices; even more customizable; Auto DJ incorporates On Demand tracks.

The bad: Audiocentric jukebox has no support for video or photos; annoying "upgrade to Plus version" offers; some may balk at playlist-centric design.

The bottom line: This music jukebox/subscription service/store combination does it all, but its playlist-centric interface can cause confusion.

Sunday 3 December 2006

Windows Media Player

Windows Media Player was first introduced to the world in the fall of 1991, with the introduction of Windows 3.0 with Multimedia extensions. This happened after Creative Labs added digital-audio sound capabilities to the PC platform with their Sound Blaster series of audio cards.

Since then, Windows Media Player has been a part of the Windows Operating System. When Windows Media Player was introduced, it featured support for only WAV and Audio CD, however today, you can listen to 5.1 and 7.1 surround sound with SRS WOW. Digital Rights Management (DRM) has also been implemented in Windows Media player helping users to rip music and also keep them secure. Windows Media Player started off as an audio player only but has evolved into what its name suggests, a true media player.

The current version of Windows Media Player (WMP) is 11, which is one of the best versions of WMP available to date. WMP 11 has native support for most video and audio formats, however some of the most popular formats such as DivX and XviD are still not supported, and you need to download and install these codecs to enable their support in WMP.

Installing Windows Media Player is extremely simple and you can download it from http://www.microsoft.com/downloads/search.aspx?displaylang=en the size being approximately 24.6 MB. You will be asked a few questions during installation pertaining to customizing your player.

Windows Media Player 11

There are a lot of functionalities in Windows Media Player that are available by default which you can use. For instance, every time you insert an audio CD in the player and if you are connected to the Internet at the time, then WMP can retrieve data from the internet for your audio CD. This helps in cataloguing information.

Similar to Winamp, Windows Media Player 11 also has equalizers and visualizations installed by default. However, these are not enabled in the typical installation and you will need to enable these (if you want to) when listening to music. WMP 11 also has SRS WOW support by default, which can be enabled in addition to the equalizers present in WMP 11.

WMP 11 also lets you listen to online radio stations and view the latest movie trailers. The new High Definition support in WMP 11 also lets you view HD trailers in its full glory, provided that you have a good broadband connection too.

Similar to Winamp, you can also download and install visualizations and extensions for WMP 11. Check out www.wmplugins.com for the latest and greatest on WMP 11.

WMP 11 has become an indispensable part of the digital audio revolution that hit PC’s about 11 years ago. For most new users, WMP 11 represents digital media to them, and they are not looking for alternatives. WMP 11 has more than enough to satisfy them!

The Good: Windows Media Player 11 has a simple and visually effective interface; excellent performance, especially with large media libraries; and solid integration with Urge, its de facto music service.

The bad: Windows Media Player 11 has some bugs to work out, though we didn't notice any major ones. Plus, there's no podcast directory yet.

The bottom line: For Windows XP users, Windows Media Player 11 is a must-have upgrade. It's Microsoft's best jukebox effort to date, thanks to a thoughtful redesign, impressive performance, and a ton of useful features.

Winamp

Ask any real music lover if he or she likes to listen to music on a PC? If the answer is yes, then they definitely use Winamp. Winamp has been around the PC music scene since the time MP3s came into being.

Here is the complete look of Winamp 5.24 - Skin, Equaliser and Playlist:

Winamp is the brainchild of Justin Frankel, an uber geek who was not satisfied with how MP3s sounded on PCs. In fact, there was no decent player that could even play MP3s properly at that time. Therefore, Justin went ahead, coded his own player, and named it Winamp. The rest is history.

Winamp was first shared amongst a few friends and from there the chain reaction started. Soon, Winamp was the most downloaded MP3 player on the Web and Justin and his friends started their company called Nullsoft, their mascot being the llama!

Winamp didn't become the most downloaded MP3 player just because it was the first one. Well, that was one of the reasons, but the other reason was its user interface. At first, it could only play MP3s but later on support for WMA was added. Today the latest version of Winamp can also play Ogg files and there are other free plug-ins available that lets it play other kinds of music files too.


You can download the latest version of Winamp from http://www.winamp.com/player/free.php/. There are two versions that you can download-Free and Pro. There are some advantages in the Pro version that are absent in the free one (obviously) however there is no limitation on playing music.

During installation, you will get the option of whether you want to see Winamp in Classic Skin or the Default Skin. Depending on what you choose, the player will open using that skin.

In Winamp, the skin refers to the way it appears to the user. Think of a skin as wallpaper that you would change in Windows. Only making a skin for Winamp requires some skills since it has to be resized and adjusted according to the dimensions of the player.

Okay, enough of that... lets move on to the interesting part. As you can see, Winamp also features an equaliser and a play list window. The equaliser lets you adjust and listen to your music according to your preferences. The Playlist window lists the songs that you have chosen to play in the player.

When Winamp first made its debut, it was a very simple player with support for only MP3 playback. Its journey since those times has been an extremely interesting one. Today, Winamp can be considered as an all-in-one solution for your audio playback, ripping and decoding, recording and more in Windows. With user support and members active worldwide this player has countless plug-ins, skins and enhancements that you can use for whatever audio task that you have in mind.

Using Winamp is child's play, since if you have ever used a tape player you can easily identify with it. Buttons are easily accessible and the player is extremely manageable. If you don't like the equalizer window, do away with it. If you want an unobtrusive mode, check out the Winamp mini mode, where the player doesn't take more than a single line on your whole screen.

Winamp not only plays audio but also video. There is also a proprietary video format for Winamp which is the .nsv format. Winamp also plays streaming online radio using Shoutcast. You can also download music by popular and not so popular artists from the Winamp Web site.

Winamp is one of the most used players on the face of this earth, and the only thing that we can say is may the tribe increase.

Tips for Winamp

1. Changing colours in Winamp

Winamp 5 (for that matter, even 3) has an interesting feature. Instead of skinning Winamp, you can choose various colours for different moods. For this, first, click the "Config" button on the main Winamp window. When the multi-tabbed dialog box appears below, click the "Colour Themes" tab. Now, choose a new colour theme as you desire by double-clicking a theme. "Varsity" is good when listening to music from the yesteryears. If the night bug's bitten you, try the "City Night" colour.

When you are done, click the button with the small arrow pointed upwards next to the tabs. This closes the "Configuration Drawer".

2. Use your own font instead of the regular Winamp font in the playlist window

Generally, the playlist font is determined by the current Winamp skin. All Winamp skins including the Modern and Classic skins have their own fonts, for that matter most skins downloadable over the Internet have their own fonts. So, if you don't like these fonts and want your own, here's what you do:

1. Right-click on the Winamp 5 title bar.
2. Choose "Options", then "Preferences".
3. When the "Preferences" dialog box appears, click "General Preferences".
4. Click "Playlist".
5. In the right pane, uncheck "Use skin or language pack font"
6. Next to the "Use font" pull-down, choose your desired font from the ones provided.
7. Click "Close" to close the dialog box.

3. Scroll Winamp Title in Taskbar

There is an option to scroll the title in Taskbar. Here's a way by which you can enable this option:

1. Right-click on Winamp 5's title-bar and choose "Options", then "Preferences".
2. When the "Winamp Preferences" dialog box appears, click on "Scroll title in the Windows taskbar".

4. Managing file associations in Winamp

If you have used Winamp earlier or are using it for the first time, then there is no way that you could have ignored the fact that Winamp takes file associations of all media files. So if an MPEG file was earlier associated with Windows Media Player, it will now open in Winamp. Sometimes, it does that even if you have restored the file association and then restarted your computer. Here is what you need to do to get rid of this irritating problem.

1. Right-click on Winamp 5's title-bar and choose "Options", then "Preferences".
2. When the "Winamp Preferences" dialog box appears, click on "File Types".
3. Uncheck "Restore file associations at Winamp start-up".
4. Press "Close" to close the "Winamp Preferences" dialog box.

5. Turn on visualizations for every song played in Winamp.

Visualizations are not enabled by default in Winamp and if you want to see the visualizations, you need to enable it every time you restart Winamp. Here's a way by which you won't need to.

1. Right-click on Winamp 5's title bar, choosing "Options" then "Preferences".
2. When the "Winamp Preferences" dialog box appears, click "Plug-ins".
3. Check "Auto execute visualization plug-in on playback".
4. Click "Close" to close the preferences dialog box.

The good: Basic, efficient, and fun to use; plug-in architecture lends itself to enhancements and customizations; nag-free access to online media, including AOL's audio and video services and 20 XM Satellite Radio channels; loyal and creative community support.

The bad: Detached, multipanel interface isn't for everyone; no direct access to online music stores besides AOL Music Now; limited to 2X ripping and burning in the free version; free version lacks MP3, AAC, and WMA encoding.

The bottom line: Winamp is still a fun player for customizing your playback experience, but most users will prefer the all-in-one experience of Windows Media Player or iTunes.

Essential Audio Tools

Let's Start with Audio Tools! At every home, the desktop PC running Windows will definitely have one common user data on the hard drive which is Audio Files. Whether it is a one or two collection or huge 10 to 20 GB of songs collection, it doesn't matter. All of us will use the players, encoders, etc. all that will enable you to take advantage of these tools and "wow" your friends with your knowledge of digital audio.

Essential Tools for your Windows Operating System

Buying a new computer with all the frills – a high-end processor, gigabytes of RAM, a hard drive with a humongous capacity, DVD writer, the best graphics card money can buy, 7.1 surround speakers, 19-inch LCD etc. Finally you install Windows XP, the OS of choice for most users, on it.

An operating system will get your machine up and running. But, it will not provide you with all the tools such as Antivirus, Photo Editing Software, Text Editors, Spread Sheets, etc. that you might require. What if you want to protect your PC with antivirus software? The bundled utilities in Windows are not in most cases, the best in what they do, nor do they allow you to perform all the tasks that you want to.

Even the most high end hardware is useless without the right software. This blog is the answer to your needs. Well almost. Here we cover various tools and utilities that you require to get the most out of your Windows machine, without being too heavy on our pocket, or for that matter, your PC!

Each software tool is covered in detail. You will learn why it is good, what are its functions, the features that make it great and a lot more info about optimising the performance of the software and
your hardware.

Visit this blog everyday for new product reviews which are very much needed for every desktop user. So lets start review of those Essential Windows Tools!